Voice Agents
Lately there has been a lot of talk about AI voice agents, and given how good models have gotten at text-to-speech and speech-to-text, that is not really a surprise. A whole ecosystem of platforms and tools has popped up to support these workflows.
Recently I was watching Twilio Summit 2026, and the voice demos were genuinely fantastic. They made me curious about exactly how this technology works and what it actually takes to put one of these agents together. As much as I liked Twilio’s platform, I am the kind of person who prefers to do things the hard way, mostly because I want to understand how the pieces fit together. So I decided to build a voice agent myself and see how hard it is to construct end to end experience and what the tech stack looks like.
In this article I want to share that journey.
The goal of this project is simple: get a phone number, dial it, and have an AI voice agent on the other end I can talk to. Because I want to do this on my own, I am not going to lean on a hosted orchestration service. That said, I am not starting completely from scratch either, because that would balloon into a much bigger project. For the phone numbers I will use Twilio and set up a SIP trunk there. For orchestrating and running the voice agent itself, I went with LiveKit.
LiveKit has a fantastic open source project written in Go. At its core it is a WebRTC “create a room” platform, but it also has a SIP gateway, which lets telephony connect into that room. Once the call lands in the room, the voice agent joins the same room and responds with synthesized voice.
I am going to keep this as simple as possible. You will need a Twilio account and a single AWS EC2 instance. I will walk through every step required to set up LiveKit and get it running well enough to verify the whole flow end to end. By the end, you will be able to pick up your phone, call your own agent, and have a conversation with it.
Let’s get started.
Setting up a voice AI agent is a multi-step process: deploying the LiveKit server on AWS, configuring Twilio to receive calls, establish routing rules in LiveKit for incoming calls, and finally, running the Python based voice agent.
How the Pieces Fit Together
Before we touch a terminal, I want to walk through the the four pieces of the tech stack we will be using.
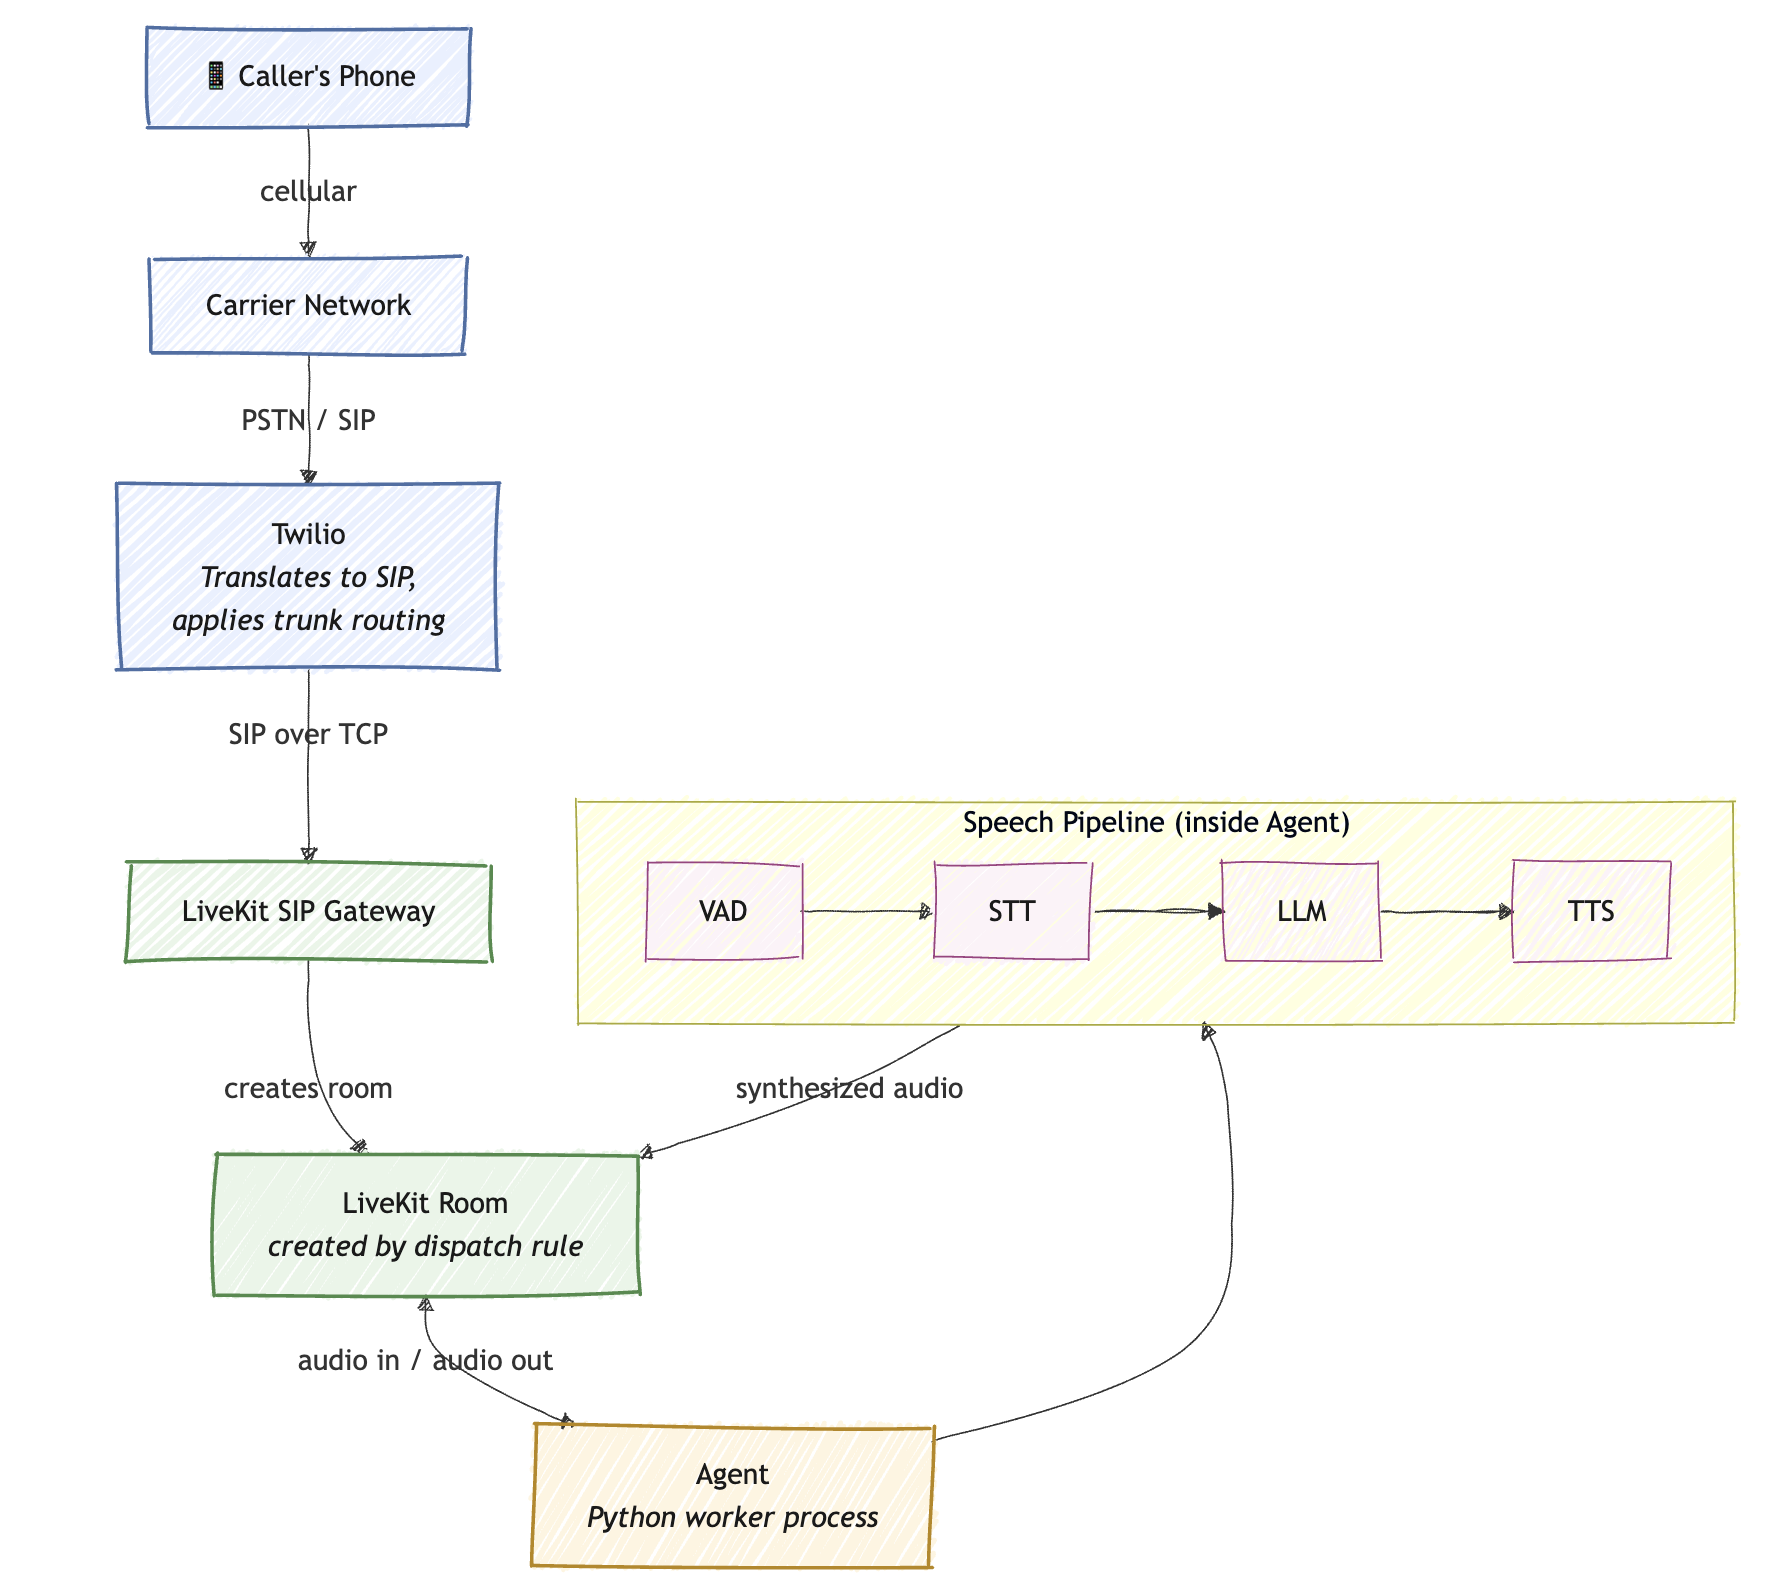
The first piece is the phone network. When someone dials the number from a mobile phone, that call travels on the carrier’s infrastructure until it hits Twilio. Twilio is essentially our on ramp from the public phone network into the IP world. The protocol that does this translation is SIP, the Session Initiation Protocol. SIP is what voice systems use to negotiate, set up, and tear down calls over IP. If you have ever heard the term VoIP, SIP is the signaling layer underneath of it.
SIP is strictly a signaling protocol. It does not actually carry the audio of the phone call. Once SIP establishes the connection and the two endpoints agree on how to communicate, a different protocol called RTP (Real-Time Transport Protocol) takes over to carry the actual digital audio packets.
The second piece is the SIP trunk. A “trunk” in old telephony jargon is a bundle of phone lines between two endpoints. A SIP trunk is the modern equivalent, a virtual link that carries call signaling and media between Twilio and our own server using SIP. Twilio’s Elastic SIP Trunking is the product we will use to do this. It allows to specify Origination URI to provide IP address or domain name of your server, and when a call comes in to your Twilio phone number, Twilio fires a SIP INVITE request to that specific server to hand off the call.
The third piece is LiveKit. LiveKit is an open source media server originally built for WebRTC use cases, things like video conferencing, livestreaming, and collaborative apps. The core abstraction in LiveKit is a Room. Participants join a room, and LiveKit handles routing audio and video between them in real time. What makes LiveKit interesting for our purposes is that it also has a SIP gateway. Incoming SIP calls can be terminated as audio participants inside a LiveKit room. That means our phone caller becomes just another participant in a room, sending audio in and receiving audio out.
The fourth piece is the agent. This is the thing that makes the call feel intelligent. The agent is a process that joins the LiveKit room as another participant, listens to the caller’s audio, runs it through speech-to-text, sends the resulting transcript to an LLM, takes the LLM’s response, runs it through text-to-speech, and plays the audio back into the room. What makes this flow feel conversational is VAD (Voice Activity Detection). Before running STT, the agent uses VAD to detect exactly when the human starts and stops speaking. This is how system handles “turn-taking,” and knows when to generate a response or when to abruptly stop its own TTS playback if the human interrupts it.
LiveKit also provides Agents SDK. This SDK abstracts away the complexity of WebRTC connection states, audio buffer management, and VAD triggering. It provides a pipeline where developers can easily plug in their preferred third-party models for STT (like Deepgram or Whisper), the LLM layer, and TTS (like ElevenLabs or OpenAI) without having to manually wire the audio byte streams together.
So the entire flow of a single call looks like this:
Once you have this mental model, the implementation boils down to four steps below. Let’s go.
Step 1: Deploy LiveKit on AWS
LiveKit publishes a self-hosting Docker Compose stack that bundles the media server, the SIP gateway, the egress and ingress workers, and a Redis instance for state. We are going to run that stack on a single EC2 instance. For getting started this is plenty. If you want to scale up, you can split the pieces across multiple boxes, but I want to stay focused on the end-to-end flow.
Provisioning the EC2 instance
Spin up an Ubuntu instance in your AWS account. A t3.medium is a good starting size. Once it is up, allocate and Elastic IP and attach it to the instance. The reason we want a static IP is that LiveKit will be the destination Twilio sends our calls to, and we will want to point a DNS record at it. If the IP is ephemeral, every reboot becomes a chore.
Speaking of DNS, create an A record in whatever DNS provider you use (Route 53 in my case) pointing a subdomain like livekit.example.com at that Elastic IP. The hostname matters because the LiveKit setup script will provision a real Let’s Encrypt TLS certificate, and that requires a domain name, not a bare IP.
Open the right ports
This is the step where it is easy to get tripped up. LiveKit and is opinionated about the networking. It needs UDP for media, and it needs wide port range so that media streams can be load balanced across many simultaneous calls. The minimum set of inbound rules you need on the security group is:
- TCP 80: ACME challenge for Let’s Encrypt cert issuance.
- TCP 443: HTTPS, used for the LiveKit signaling endpoint and the SIP gateway over TLS.
- TCP 7881: TURN/TCP fallback. Some networks block UDP entirely, and this gives WebRTC a TCP path.
- UDP 443: TURN/UDP. This is the preferred path for media when the client’s network allows it.
- UDP 10000-60000: The actual media port range. This is where the audio packets flow once a call is established. Without this range open, you will see calls connect and then immediately go silent, which is a fun debugging experience ;-).
- UDP 5060: Twilio SIP signaling.
For lab setup, you can probably get away with opening these to 0.0.0.0/0 but that is pretty much wide open. Instead, you should tighten down these ports to Twilio IP ranges:
- UDP 10000-60000: 168.86.128.0/18
- 5060 (UDP/TCP), 5061 (TLS): 54.172.60.0/30
Install Docker and run the LiveKit setup wizard
SSH into the EC2 VM and make sure Docker and Docker Compose are installed. Once Docker is in place, LiveKit gives you an interactive setup script that asks a few questions and writes out a complete docker-compose.yaml along with TLS certificates. Run it from an empty directory:
sudo docker run --rm -it -v $PWD:/output livekit/generate
The wizard will ask you for the domain name you set up earlier, and it will provision certificates automatically. The important output to capture is the API key and API secret. Save those somewhere safe. We will need them shortly when we configure the CLI and the agent.
When the wizard finishes, you should have a folder full of generated files. Bring the the stack up:
sudo docker-compose up -d
Give it a minute, then verify the server is reachable by hitting https://livekit.example.com in a browser. You should get response from LiveKit, even if it is a minimal one. If TLS doesn’t validate, double check your DNS record and make sure port 80 was open during certificate issuance.
At this point we have a LiveKit server running with a real certificate. Now we need calls to send into it.
Step 2: Configure Twilio SIP Trunking
Twilio is going to be our bridge from the public phone network into our LiveKit instance. Conceptually, what we are doing in this step is buying a phone number, attaching it to a SIP trunk, and telling that trunk where to forward incoming calls.
Buy a number
In the Twilio Console, go to Phone Numbers->Manage->Buy a number and pick up a phone number. Any standard US number works fine. Twilio may charge you for this number and its use, but for a personal project the cost is negligible.
Create the SIP trunk
Now go to Elastic SIP Trunking->Manage->Trunks and create a new trunk. Name it something descriptive like “LiveKit Agent Trunk.” A SIP trunk in Twilio is basically a configuration object the associated numbers.
In the trunk’s settings, find the Numbers tab and assign the phone number you just purchased to this trunk. That binds the number to this SIP configuration.
Configure Origination
The term Origination in Twilio’s SIP world refers to inbound calls, calls originating from the PSTN that need to be delivered. somewhere.
Go to Origination under your SIP Trunk settings. Add a new Origination URI formatted exactly like this:
sip:livekit.yourdomain.com;transport=udp
Set the priority to 10 and weight to 10 (these matter when you have multiple URIs for failover, but with one URI that values don’t really matter as long as both are set). Save the configuration.
At this point, dialing your number routes a SIP INVITE to your LiveKit server. But LiveKit does not yet know what to do with that invite. That’s the next step.
Step 3: Configure LiveKit to Accept Calls
LiveKit needs two things in order to handle inbound SIP calls: an inbound trunk definition and a dispatch rule. The inbound trunk definition tells the server to accept calls from the given telephone numbers and the dispatch rule, decides which room to place the incoming call based on the specified properties. These are configured via LiveKit’s CLI tool, lk.
You can run this tool either from your macOS or directly from your EC2 VM. If you are installing on macOS:
brew install livekit-cli
If you are going to run it on Ubuntu in your EC2:
curl -sSL https://get.livekit.io/cli | bash
You can verify installation with:
lk --version
After the client is installed, export the credentials captured during the setup wizard:
export LIVEKIT_URL=https://livekit.example.com
export LIVEKIT_API_KEY=the_generated_api_key
export LIVEKIT_API_SECRET=the_generated_api_secret
The CLI uses these to authenticate against your server.
Define the inbound trunk
Create a file called trunk.json. Put your Twilio number in there in E.164:
{
  "trunk": {
    "name": "Twilio Trunk",
    "numbers": ["+15551234567"],
    "allowed_addresses": ["54.172.60.0/73"]
  }
}
When LiveKit sees a SIP INVITE addressed to a number in inbound trunk configuration, it will accept it. If the call’s destination number is not in this list, LiveKit will reject the INVITE.
To apply the configuration:
lk sip inbound create trunk.json
To verify it worked, list the inbound trunks:
lk sip inbound list
You should see a table with inbound trunk. Note the SIP trunk ID from this list, you will need it for dispatch rule.
Define the dispatch rule
Now LiveKit accepts the call, but where does the audio go? That is what dispatch rules answer. A dispatch rule pattern matches incoming calls, decides what room to place them in, and determines which agent should handle the conversation.
Create dispatch.json:
{
  "dispatchRule": {
    "name": "Agent Route",
    "trunkIds": [
      "ST_CuebaVY2GbGP"
    ],
    "rule": {
      "dispatchRuleIndividual": {
        "roomPrefix": "call-"
      }
    },
    "roomConfig": {
      "agents": [
        {
          "agentName": "inbound-voice-agent"
        }
      ]
    }
  }
}
The dispatchRuleIndividual strategy creates a fresh room for every incoming call. LiveKit will generate a unique room name like call-XYZABC for each call. This guarantees isolation so two different callers don’t end up in the same room. There are other dispatch strategies explained in LiveKit documentation.
But we do not want an empty room, we want our AI agent to answer the phone. Defining roomConfig, explicitly tells LiveKit to wake up the worker named inbound-voice-agent and drop it into the newly created room.
The trunkIds array ensures that the routing logic only applies to calls originating from the specific SIP trunk.
Apply dispatch rule with:
lk sip dispatch create dispatch.json
You can verify the configuration with lk sip inbound list and lk sip dispatch list. If both show what you expect, the LiveKit side is fully wired up. Calls will now be accepted and land in fresh rooms. The only thing missing is something to actually answer.
Step 4: Build and Run the Voice Agent
This is the fun part. The agent is a Python process that connects to LiveKit, watches for new rooms being created by the dispatch rule, and joins them as a participant. Once joined, it runs the speech pipeline that turns the conversation into something useful.
Concepts: VAD, STT, LLM, TTS, and the Agent SDK
Before showing the code, let me unpack the four building blocks that LiveKit Agents SDK ties together.
VAD (Voice Activity Detection) is a small, fast model whose only job is to decide if the caller is currently speaking, or is it s silence/background noise. Without VAD, you would have to either constantly stream audio to an STT model or guess at where utterances start and end. VAD lets the agent know when user stopped talking and when it is safe to start generating response. We will use Silero, which is a small open source VAD model that runs locally on the agent process.
STT (Speed to Text) takes the audio buffer of an utterance and produces a transcript. We will use OpenAI’s STT (Whisper under the hood), but the SDK lets you swap in others trivially.
LLM (Large Language Model) takes the transcript plus the conversation history plus system prompt, and produces a response. We will use gpt-4o-mini because it is cheap and fast enough for conversational latency.
TTS (Text to Speech takes the LLM’s response and converts it to audio that gets played back into the room. Again, OpenAI for simplicity.
The LiveKit Agents SDK orchestrates these. You define an Agent class with instructions, an AgentSession that wires the VAD/STT/LLM/TTS components together, and an entrypoint function that is called every time a new room appears. The framework handles the rest. It subscribes to the caller’s audio track, runs it through VAD, buffers utterances, calls STT, feeds the LLM, streams the TTS back as audio. There is a fair amount of magic happening, but SDK’s API surface is very small.
One technique worth knowing about is prewarming. The Silero VAD model has to be loaded into memory before it can do anything useful, and loading it takes non-trivial amount of time. If you load it on the first call, the caller hears dead air while the model spins up. The SDK provides a prewarm hook that runs at process startup, so the model is ready by the time a cal actually comes in.
Create Agent
Create Agent environment. If you need to install uv on your EC2 VM type this:
curl -LsSf https://astral.sh/uv/install.sh | sh
source $HOME/.local/bin/env
uv --version
Create agent folder:
mkdir agent
cd agent/
Create and activate environment:
uv venv
source .venv/bin/activate
Install dependencies:
uv pip install livekit-agents livekit-plugins-silero livekit-plugins-openai python-dotenv
Provide Open AI API key:
export OPENAI_API_KEY=your-key
Create agent.py:
import logging
import asyncio
from dotenv import load_dotenv
from livekit.agents import JobContext, JobProcess, Agent, AgentSession, AgentServer, cli
from livekit.plugins import silero, openai

load_dotenv()
logger = logging.getLogger("phone-agent")
logger.setLevel(logging.INFO)

server = AgentServer()

# Pre-load the Voice Activity Detection (VAD) model
def prewarm(proc: JobProcess):
    proc.userdata["vad"] = silero.VAD.load(min_silence_duration=0.3)

server.setup_fnc = prewarm

class SimplePhoneAgent(Agent):
    def __init__(self) -> None:
        super().__init__(
            instructions="You are a helpful phone assistant. Keep your answers brief and conversational."
        )

    async def on_enter(self):
        # Triggers the LLM to greet the user immediately upon answering
        self.session.generate_reply()

@server.rtc_session(agent_name="inbound-voice-agent")
async def my_agent(ctx: JobContext):
    logger.info(f"Answering call in room: {ctx.room.name}")

    session = AgentSession(
        stt=openai.STT(),
        llm=openai.LLM(model="gpt-4o-mini"),
        tts=openai.TTS(),
        vad=ctx.proc.userdata["vad"],
        preemptive_generation=True,
    )

    agent = SimplePhoneAgent()
    await session.start(agent=agent, room=ctx.room)
    await ctx.connect()

if __name__ == "__main__":
    cli.run_app(server)
A few things to point out in this code.
The AgentServer is the long running process that watches LiveKit for new rooms and dispatches a worker for each one. It is essentially the supervisor.
The prewarm function is wired into server.setup_fnc. It runs once per worker process before any call lands, and we cache the loaded VAD model on proc.userdata so the per-call code can pull it back out without reloading.
The SimplePhoneAgent class is where the agent’s personality lives. The instructions are the system prompt for the LLM. The on_enter hook runs as soon as the agent joins the room, and self.session.generate_reply() causes the LLM to produce and opening line without waiting for the caller to speak first. Without this, you would pick up the phone and hear silence until you said hello.
The @server.rtc_session(agent_name="inbound-voice-agent") decorator marks my_agent as the entrypoint that runs for each new room. The agent_name must match the name in dispatch rules, otherwise your agent will not be called.
The preemptive_generation=True flag tells the SDK to start generating a response as soon as it has a partial transcript, instead of waiting for the full one. This shaves perceptible latency off responses, which matter a lot in voice.
Configure the environment and run
Create a .env or export following variables in the same folder as Agent:
LIVEKIT_URL=https://livekit.example.com
LIVEKIT_API_KEY=your_api_key
LIVEKIT_API_SECRET=your_api_secret
OPENAI_API_KEY=your_openai_api_key
Then start the agent in dev mode:
python agent.py dev
Note: Even if you are in testing, you want agent process running and not die when you ssh session goes away. To do that you can simply use tmux new and start your agent inside tmux session. You can go back with Ctrl-b d and attach again with tmux attach.
Testing
Pick up your phone and dial the Twilio number. Here is what happens behind the scenes:
- The cellular network routes your call to Twilio.
- Twilio’s Elastic SIP Trunking sees the destination number, looks at the trunk’s Origination configuration, and sends a SIP INVITE to
sip:livekit.example.com;transport=udp. - LiveKit’s SIP gateway receives the INVITE, checks against the inbound trunk we created, and accepts it because the destination number is in the allowed list.
- The dispatch rule fires and creates a new room with name like
call-XYZ123. Your call is placed into that room as an audio participant. - The agent server, which has been watching for new rooms, spins up a worker for this room. The worker calls
my_agent, which starts the session and connects to the room. - As soon as the agent joins,
on_enterfires the greeting. The TTS audio plays back into the room and out into your phone. - You speak. VAD detects the speech, STT transcribes, the LLM responds, and TTS synthesizes the response, and the loop continues.
If everything is wired up correctly, you should be talking to a working voice agent. If something is off, the most common problems are:
- ports not open on the security group.
- DNS not resolving, Twilio cannot reach the server at all.
- Agent process not running (call connects but no one answers).
- API keys not set.
Wrapping Up
That is the whole end to end loop and it is honestly remarkable how easy and how few moving parts it takes to put this together.
There is plenty more to explore from here. You can swap in different LLMs, different STT and TTS providers, or self-hosted models running on your own hardware. You can extend the agent with tools so it can look things up, take actions, or hand off to a human. You can add caller ID lookups, call recording, transcription archival, fraud checks, or anything else your use case demands. The architecture supports all of it because LiveKit’s room abstraction is just media, and the agent can do whatever it wants with that media.
In the next post I want to take this further and start building something more interesting on top of what we built here. For now, though, you have a working voice agent on a real phone number, and that is a pretty good place to stop and call it a day.